Thank you to everyone who follows this blog. Here's wishing you all happiness and good health in the year to come! While I'm deciding which painting to post next, here is a riveting (but very long) article about authentication of potentially priceless, unattributed works. It reads like fiction, but the truth is even more fascinating. You must read at least half way to the end...
The Mark of a Masterpiece
20101231
20101228

20101226
Cherry Pie

Before we all go on our New Year's diets, let's have some more pie! 6" X 8", oil/canvas panel.
20101221
Happy Solstice!
There are many reasons to be happy at this time of the year; one reason is that starting today, the days get longer. Another reason is that everywhere you turn, there's pumpkin pie!

6" X 8", oil/ canvas panel.

6" X 8", oil/ canvas panel.
20101220
Still Life with Olive Oil

Did a couple of these, on the last sunny day last week. This was the second one, and the sun was streaming in just as it was about to set. This is 8" X 10" oil on panel.

20101214
Peggi Kroll Roberts Workshop, day three
Another cloudy day, so we painted indoors again. We began with the contour drawings, and then another exercise to reinforce value. This time, we mixed different pairs of colors that would be used to define light and shadow on the figure. Peggi encouraged us to mix any combination that we wanted to try. Warm and cool, light and dark, equal values--anything. Using equal values is a good way to practice defining form with change of color rather than value, something that's very useful for preserving a value family in the overall value plan of a picture, while still being able to differentiate forms within it. Peggi decided to do a demo with a pair of equal value colors, and took it a step further by using the cool color to define the illuminated areas, and the warm color to represent shadow. Interesting!
Here's her palette. She squeezes out quite a bit of paint even for a small study, something else I'm trying to do more.

Here's the demo. First step is a line drawing of the form, keeping in mind the proportions of the body. Indicate the light and shadow areas with line, then fill in with your two colors.

Your computer monitor may show those two colors as being different values, but in person, they were absolutely equal. This subject worked very well with the cool "light" and warm "shadow", and the equal values created a nice visual vibration.
Here is one of my studies (left) using equal values (warm light/cool shadow) and a board of more examples that Peggi brought. The lower right image is just two values for the figure and background. These are wonderful exercises to practice drawing, modeling the form, and creating a value plan while trying any color combinations that you're wondering about.

A painting friend of mine, Kathryn Townsend, took a workshop with Peggi last summer (see her blog entries about that here). She said that Peggi mentioned a technique she had used for a year to help maintain coherent value families: she drew a line down the middle of her palette and mixed only "light family" colors on one side, and "shadow family" colors on the other. I asked Peggi about that the first day, and she said absolutely yes, that's very helpful. She painted a line down the middle of my palette, and I left it there. I painted that way for the rest of the workshop, and it helped me SO much to keep my values right. It's been a very bad habit of mine to mix my colors all over the palette, wherever there's room. Now, that separation on the palette is becoming automatic, and the paintings benefit from it because the value groups are much better-defined.
We talked about modeling the form, and the difference between form shadow vs. cast shadow. Form shadow is created as the form turns away from the light. It is a softer-edged shadow, usually transitioning through a half tone between the light and the shadow areas. A cast shadow, on the contrary, can be very hard-edged.
We did two paintings from the models, again these were 40-minute sessions, and again there were fairly well-defined value families, simplified and consolidated. This time we paid more attention to form shadow vs. cast shadow, using half tones where the form turned, and again trying to use color instead of value to define shapes within each value family.

12" X 9", oil/panel.
For the final painting session of the workshop, we did the celebrated "Limited Strokes" exercise. I was looking forward to this one. It's such a wonderful way to loosen up, pile on the paint, and surprise yourself.
Here's Peggi's demo. Start with a line drawing, mix vast piles of color on your palette, and then create a painting with as few strokes as possible.

An entire area of background can be done with one stroke, but you have to really load the brush. No back and forth, no scrubbing. The brush must move forward at all times, but you can roll it over to double back and continue filling in an area. Each completed stroke is tallied by putting a dab next to the painting, so you don't lose count. Peggi had the one above finished in less than 20 strokes, but added a few more touches to put in the features of the face and folds on the beach towel. Here are two other example paintings that Peggi brought. You can count the "dabs" and see that it took her very few strokes to complete these lovely works:

And here are mine. I did one using a line drawing and adding features, and the total stroke count for that one (left) was 28. Then, there were 10 minutes left in the pose and I had half a panel bare. So I tried another one without a drawing, creating the form as I went. It's much less accurate and detailed, but it's only 16 strokes (count the dabs).

As Peggi says, this exercise helps you think about mixing enough paint to cover the area you plan to cover, and gets you to really load your brush. You get a result that's supremely painterly and not overworked. Even if this is not how you want to paint all the time, this exercise will stretch some painting "muscles."
And now, a shameless plug for Peggi's set of DVDs. The limited stroke exercise is one of the lessons, and the value work that we did is covered on others. They aren't a substitute for taking a workshop with her (which I totally recommend that you do), but they're a great (and inexpensive) way to make solid improvement in your painting, no matter what your style is.
A few closing thoughts from Peggi:
Don't gray down the flesh tones in shadow. Even in shadow, flesh is full of color.
Remember that you're making a painting, telling a story! You're not required to slavishly record local color if you can enhance the painting with some colorful innovation. Make marks, use accent colors, make it sing!
Use your two secret weapons. Pocket mirror and sketchbook!
And most importantly, keep painting. :)
Here's her palette. She squeezes out quite a bit of paint even for a small study, something else I'm trying to do more.

Here's the demo. First step is a line drawing of the form, keeping in mind the proportions of the body. Indicate the light and shadow areas with line, then fill in with your two colors.

Your computer monitor may show those two colors as being different values, but in person, they were absolutely equal. This subject worked very well with the cool "light" and warm "shadow", and the equal values created a nice visual vibration.
Here is one of my studies (left) using equal values (warm light/cool shadow) and a board of more examples that Peggi brought. The lower right image is just two values for the figure and background. These are wonderful exercises to practice drawing, modeling the form, and creating a value plan while trying any color combinations that you're wondering about.

A painting friend of mine, Kathryn Townsend, took a workshop with Peggi last summer (see her blog entries about that here). She said that Peggi mentioned a technique she had used for a year to help maintain coherent value families: she drew a line down the middle of her palette and mixed only "light family" colors on one side, and "shadow family" colors on the other. I asked Peggi about that the first day, and she said absolutely yes, that's very helpful. She painted a line down the middle of my palette, and I left it there. I painted that way for the rest of the workshop, and it helped me SO much to keep my values right. It's been a very bad habit of mine to mix my colors all over the palette, wherever there's room. Now, that separation on the palette is becoming automatic, and the paintings benefit from it because the value groups are much better-defined.
We talked about modeling the form, and the difference between form shadow vs. cast shadow. Form shadow is created as the form turns away from the light. It is a softer-edged shadow, usually transitioning through a half tone between the light and the shadow areas. A cast shadow, on the contrary, can be very hard-edged.
We did two paintings from the models, again these were 40-minute sessions, and again there were fairly well-defined value families, simplified and consolidated. This time we paid more attention to form shadow vs. cast shadow, using half tones where the form turned, and again trying to use color instead of value to define shapes within each value family.


12" X 9", oil/panel.
For the final painting session of the workshop, we did the celebrated "Limited Strokes" exercise. I was looking forward to this one. It's such a wonderful way to loosen up, pile on the paint, and surprise yourself.
Here's Peggi's demo. Start with a line drawing, mix vast piles of color on your palette, and then create a painting with as few strokes as possible.

An entire area of background can be done with one stroke, but you have to really load the brush. No back and forth, no scrubbing. The brush must move forward at all times, but you can roll it over to double back and continue filling in an area. Each completed stroke is tallied by putting a dab next to the painting, so you don't lose count. Peggi had the one above finished in less than 20 strokes, but added a few more touches to put in the features of the face and folds on the beach towel. Here are two other example paintings that Peggi brought. You can count the "dabs" and see that it took her very few strokes to complete these lovely works:


As Peggi says, this exercise helps you think about mixing enough paint to cover the area you plan to cover, and gets you to really load your brush. You get a result that's supremely painterly and not overworked. Even if this is not how you want to paint all the time, this exercise will stretch some painting "muscles."
And now, a shameless plug for Peggi's set of DVDs. The limited stroke exercise is one of the lessons, and the value work that we did is covered on others. They aren't a substitute for taking a workshop with her (which I totally recommend that you do), but they're a great (and inexpensive) way to make solid improvement in your painting, no matter what your style is.
A few closing thoughts from Peggi:
Don't gray down the flesh tones in shadow. Even in shadow, flesh is full of color.
Remember that you're making a painting, telling a story! You're not required to slavishly record local color if you can enhance the painting with some colorful innovation. Make marks, use accent colors, make it sing!
Use your two secret weapons. Pocket mirror and sketchbook!
And most importantly, keep painting. :)
20101211
Peggi Kroll Roberts Workshop, day two
We started each day's work with ten 1-minute poses which we drew using a "semi-blind contour" method. "Contour" means drawing the outer perimeter of the form. A "blind" contour drawing means that you do not look at the paper at all, but we were allowed to occasionally look and re-orient ourselves. When looking at the paper, the pen stopped--no drawing while looking at the paper. Stop the pen, look down and see where you are, then look at the model again and continue to draw.
This exercise facilitates a connection between what the eye observes, and how the hand moves in response to it. It's a direct link to the right brain, because the left brain isn't watching the results and trying to interfere. (We all know how that goes.) Obviously the results are nothing like a finished drawing, and in the case of true blind contour drawings, often don't resemble anything at all (because that's not the point).
Here are six of mine, the most recognizable. If you look at the ghost images coming through the back of the sheets, it's clear that I stopped the pen and looked quite often (probably too often). These are each 8" X 6". We used permanent marker rather than pencil because with ink, you have to commit.

Peggi draws a lot. In fact, just about any time she's sitting still, she's making art. She showed us reams of notebooks filled with drawings, sketches and gouache studies. That all contributes to the "mileage" which is what helps us grow as painters. As she reminded us each day, a painter's two secret weapons are a sketchbook and a pocket mirror. More about the mirror later.
Today as yesterday, we focused on getting correct proportions of the figures, and establishing effective "value families". Here is Peggi's demo, to illustrate the procedure: correct line drawing of the form, mass in the dark value family, then choose the lightest area in the picture plane and define that.

Work the whole picture plane, restating the dark values and maintaining the value plan which holds it all together. The conditions were not ideal for this demo, since we were indoors and the room was dimly lit with bright light coming in sideways from the windows, causing glare on the painting surface.
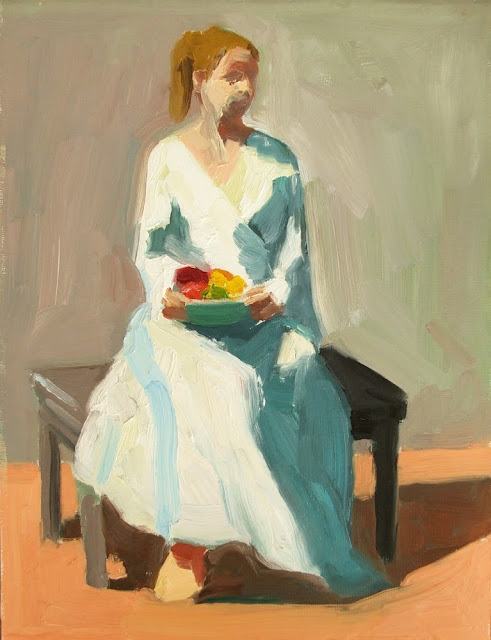
The models did two 20-minute poses for each of four paintings done today. Mine were all on 12" X 9" supports, probably a little large for that time frame, but it was good for me to push it like that. In order, here are my four paintings. Two of them (the first and the last) were damaged in transit coming home, so they've been retouched. The other two are exactly as finished in the 40-minute session.


That third one (red dress) is my favorite. My other favorite will post tomorrow. And the pocket mirror? It's for constantly checking your work, to give you a fresh "eye". As you're working, you become unable to see the work objectively. A mirror allows you to see it with a fresh perspective, and makes errors more perceptible.
This exercise facilitates a connection between what the eye observes, and how the hand moves in response to it. It's a direct link to the right brain, because the left brain isn't watching the results and trying to interfere. (We all know how that goes.) Obviously the results are nothing like a finished drawing, and in the case of true blind contour drawings, often don't resemble anything at all (because that's not the point).
Here are six of mine, the most recognizable. If you look at the ghost images coming through the back of the sheets, it's clear that I stopped the pen and looked quite often (probably too often). These are each 8" X 6". We used permanent marker rather than pencil because with ink, you have to commit.

Peggi draws a lot. In fact, just about any time she's sitting still, she's making art. She showed us reams of notebooks filled with drawings, sketches and gouache studies. That all contributes to the "mileage" which is what helps us grow as painters. As she reminded us each day, a painter's two secret weapons are a sketchbook and a pocket mirror. More about the mirror later.
Today as yesterday, we focused on getting correct proportions of the figures, and establishing effective "value families". Here is Peggi's demo, to illustrate the procedure: correct line drawing of the form, mass in the dark value family, then choose the lightest area in the picture plane and define that.

Work the whole picture plane, restating the dark values and maintaining the value plan which holds it all together. The conditions were not ideal for this demo, since we were indoors and the room was dimly lit with bright light coming in sideways from the windows, causing glare on the painting surface.
The models did two 20-minute poses for each of four paintings done today. Mine were all on 12" X 9" supports, probably a little large for that time frame, but it was good for me to push it like that. In order, here are my four paintings. Two of them (the first and the last) were damaged in transit coming home, so they've been retouched. The other two are exactly as finished in the 40-minute session.


20101209
Peggi Kroll Roberts Workshop, day one
When you look at Peggi's beautiful work, the first impression might be that they are all about color. And the color is radiant, but the greater key to their success is value. Value is the foundation that successful paintings are built on.
We started each day with ten 1-minute semi-blind-contour drawings of a model (using an "I'm committed!" ink pen), to warm up and get our right brains relating to the figure. I'll post some of mine in tomorrow's entry.
Peggi's extensive background as an illustrator means that her drawing skills are top notch. She began by giving a review of how to determine correct proportions of the figure in a landscape, and in relation to other figures.

Human adults are typically 7 1/2 to 8 head-heights, with a fairly predictable proportion. Peggi reviewed where body "landmarks" typically fall within the overall height, and showed how to use simple one-point perspective to position other figures within a scene (instead of using trial-and-error like many of us do). In this illustration, she's already showing how to model the form with two values after determining the light source (arrow at upper right). The value plan is what lays that foundation.
Here are examples of value plans that Peggi has done to visualize the layout of a painting:

These plans using two, three or four values resolve all the composition questions before the final painting is even started. Notice in the panel on the right that once the value composition is decided, the sketch can be used for trying out color swatches to confirm that the value is what you want, before you put it down on the final painting. How light or dark should the colors be to stay within your value plan? Mix them, try them against your value sketch, and adjust them.
Here's one of Peggi's vivid examples of how a value plan contributes to the success of a painting:

Values established, the simplified composition in the painting at right allows the viewer to focus on the figure's gesture and form without the distraction of the ground shadow.
We had two lovely models to work from, and some cooperation from the sun. We did four two-value sketches of the models against a white background, to recognize light and shadow while keeping the figures proportioned and correct relative to each other. These were 20-minute poses. Here are mine:

Not bad, but when the models were lying down, I slipped up on the landmarks for the near figure and made her legs too short. It's important to lock in the drawing before worrying about value.
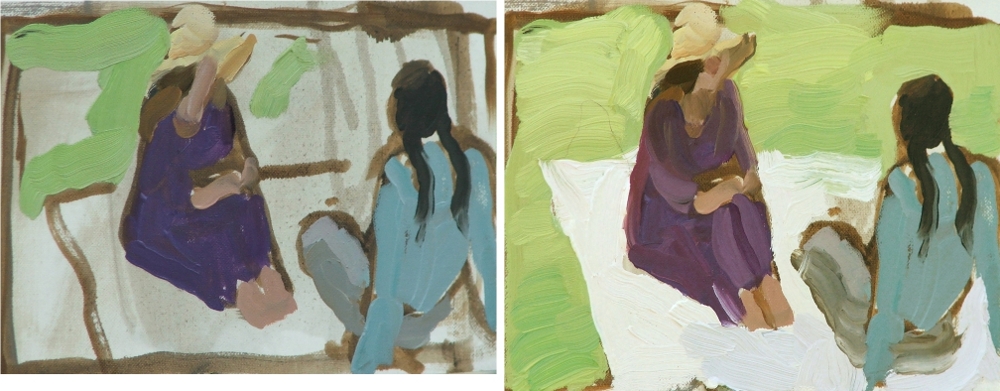
After lunch, time for color. By this time, the clouds had rolled in and we had no direct sun, so Peggi did a demo using local color to establish value instead of sunlight and shadow. In the snapshot of the early stages (at left), you can see that she begins with a monochromatic underpainting to mass in the darks of the value plan, and then applies color over it.

And then, we caught a break when the sun came back out for our two painting sessions that afternoon. The assignment was to keep to a two-value scheme for the figures and shadow, with possibly a third value in the background. Within one value "family", forms can be defined and modulated with color rather than value. Compositions are more successful when value groupings are simplified and consolidated rather than being scattered all over the picture plane.
Here are mine, 8 X 12 " and 12 X 8". Each painting was done from two 20-minute poses (40 minutes total per painting).


We started each day with ten 1-minute semi-blind-contour drawings of a model (using an "I'm committed!" ink pen), to warm up and get our right brains relating to the figure. I'll post some of mine in tomorrow's entry.
Peggi's extensive background as an illustrator means that her drawing skills are top notch. She began by giving a review of how to determine correct proportions of the figure in a landscape, and in relation to other figures.

Human adults are typically 7 1/2 to 8 head-heights, with a fairly predictable proportion. Peggi reviewed where body "landmarks" typically fall within the overall height, and showed how to use simple one-point perspective to position other figures within a scene (instead of using trial-and-error like many of us do). In this illustration, she's already showing how to model the form with two values after determining the light source (arrow at upper right). The value plan is what lays that foundation.
Here are examples of value plans that Peggi has done to visualize the layout of a painting:

These plans using two, three or four values resolve all the composition questions before the final painting is even started. Notice in the panel on the right that once the value composition is decided, the sketch can be used for trying out color swatches to confirm that the value is what you want, before you put it down on the final painting. How light or dark should the colors be to stay within your value plan? Mix them, try them against your value sketch, and adjust them.
Here's one of Peggi's vivid examples of how a value plan contributes to the success of a painting:

Values established, the simplified composition in the painting at right allows the viewer to focus on the figure's gesture and form without the distraction of the ground shadow.
We had two lovely models to work from, and some cooperation from the sun. We did four two-value sketches of the models against a white background, to recognize light and shadow while keeping the figures proportioned and correct relative to each other. These were 20-minute poses. Here are mine:

Not bad, but when the models were lying down, I slipped up on the landmarks for the near figure and made her legs too short. It's important to lock in the drawing before worrying about value.
After lunch, time for color. By this time, the clouds had rolled in and we had no direct sun, so Peggi did a demo using local color to establish value instead of sunlight and shadow. In the snapshot of the early stages (at left), you can see that she begins with a monochromatic underpainting to mass in the darks of the value plan, and then applies color over it.
And then, we caught a break when the sun came back out for our two painting sessions that afternoon. The assignment was to keep to a two-value scheme for the figures and shadow, with possibly a third value in the background. Within one value "family", forms can be defined and modulated with color rather than value. Compositions are more successful when value groupings are simplified and consolidated rather than being scattered all over the picture plane.
Here are mine, 8 X 12 " and 12 X 8". Each painting was done from two 20-minute poses (40 minutes total per painting).


20101206
Wetland
This is an older painting, from the workshop with Camille in 2008. It's the one I kept, out of all the great work I did during that week, thinking I wouldn't let it go. But it's available now, so here it is again:
 10" X 8", oil (palette knife) on canvas panel

20101130
Fall Cove (sold to benefit Japan)

I was sick over the holiday weekend, and two things always happen when I paint while sick. 1. I get tentative and fussy with the paint, and 2. I'm never happy with what I do. That means a lot of scraping off and re-doing sections until I get mad enough to put some paint down like I mean it. It was a battle, but I'm finally okay with this one. Contrary to popular belief, we do get a lovely change of seasons in San Diego! You just have to pay attention. 6" X 8" oil/canvas panel.
20101126
After the Storm (sold)

La Playa Cove, with the last dark clouds moving out after the rains. The focus is on relative values, and using them to portray the spectacular brightness of the sun and that reflection. 8" X 6" oil on canvas panel.
(Sold)
20101119
Sunrise 5

20101117
Sunrise 4

20101116
Cloudburst (sold)

Very fast sketch of some very fast moving dark clouds. Before I finished painting, they were overhead and it was pouring. Since this is the view out our window, I was indoors, nice and dry. 6 X 8" oil/canvas panel.
20101112
Sunrise 3

Shadows have beautiful color, and can say so much about the presence of things not seen. Third in a series done at Fort Rosecrans, with the Cabrillo Monument Visitor Center in the background. 6 X 8", oil on canvas panel.
These small plein air paintings are done with my Guerrilla Painter Thumb-box which fits on the small rear rack of my road bike. I ride out to wherever I paint on site, so keeping it small is helpful. If I'm hiking or taking public transit, I use a larger EasyL setup with tripod. There's something very enjoyable about keeping the setup so simple though, and people seem genuinely happy to see someone out there with a bike and a paint box. Sometimes they stop and say so, which is very nice of them. Here's my setup--everything I need, box and all, fits into that canvas bag which I bungee onto the rack (where the box is sitting).

20101110
Sunrise 2

We've had beautiful sunny mornings lately, and the shadows are wonderful. 6" X 8" plein air, oil on canvas panel.
20101102

20101023
Ikea Kitchen #3

I like that these are getting more abstract, more about shapes and color. That's where the beauty is. 8" X 10", oil on panel.
20101007

20100924

20100913

20100904
Backlit

Self portraits in the mirror are a challenge (mainly because the model keeps moving). The challenge with this one was to define the form with very subtle changes in value and color, because the whole subject is in shadow.
20100829

20100826
Fog

I love when the fog does this, creeping over the Point like fingers. This was the afternoon of the same day as the previous post. 6 X 8", plein air, oil/canvas panel.
20100825
Morning ebb tide

In the morning before the winds come up, especially if the tide is ebbing, the surface of the water is smooth as glass. 8 X 6", plein air, oil/canvas panel.
20100821
La Playa Cove (sold)

Fog over the Point. First painting in our new home; this is the view from our balcony. Of course it's full of boats, since the Yacht Club is right here, but this is the essence of the water and Point Loma. This will be a series. 6 X 6", plein air. (sold)
20100815
Grounded

My mom loves hummingbirds, so a dear friend of hers sends her hummingbird figurines. Her house is full of all sorts of them. These two sat on a sunny windowsill.
20100813
Apples

The other quick sketch to get the feel of the water-soluble oil paints. I tried a loose wash for a background, just diluting the paint with water. It makes a lovely wash, with more substance but also more stickiness and drag than paint thinned with spirits. All in all I love how these paints make me push more. They're forgiving of indecision too, since they chalk up less than traditional oils when an area is re-worked.
20100812
Clearcut
For my trip to Oregon, I bought a selection of Holbein Duo water-soluble oils so I wouldn't have to deal with finding some thinner and oil mediums. I've never used these before, but a number of my painting friends like them. They do handle differently and take some getting used-to. To try them out, I dashed off a couple very fast and loose sketches. This is the consummate Oregon landscape--thick woods with a bare slope of clearcut.
20100811
Squash

While visiting Mom in Oregon, I was fortunate to meet a group of enthusiastic and dedicated painters who allowed me to sit in on their weekly class. I did this little still life with some "props" that happened to be available, and thoroughly enjoyed the energy and spirit of the group. The teacher has a very good eye and insight, and contributed some very helpful feedback. Thanks, all you Rogue River Painters!
20100718
Memorial Drive trees

As it came out of the paint box. A 30-minute session while under attack from small black ants.
Subscribe to:
Posts (Atom)